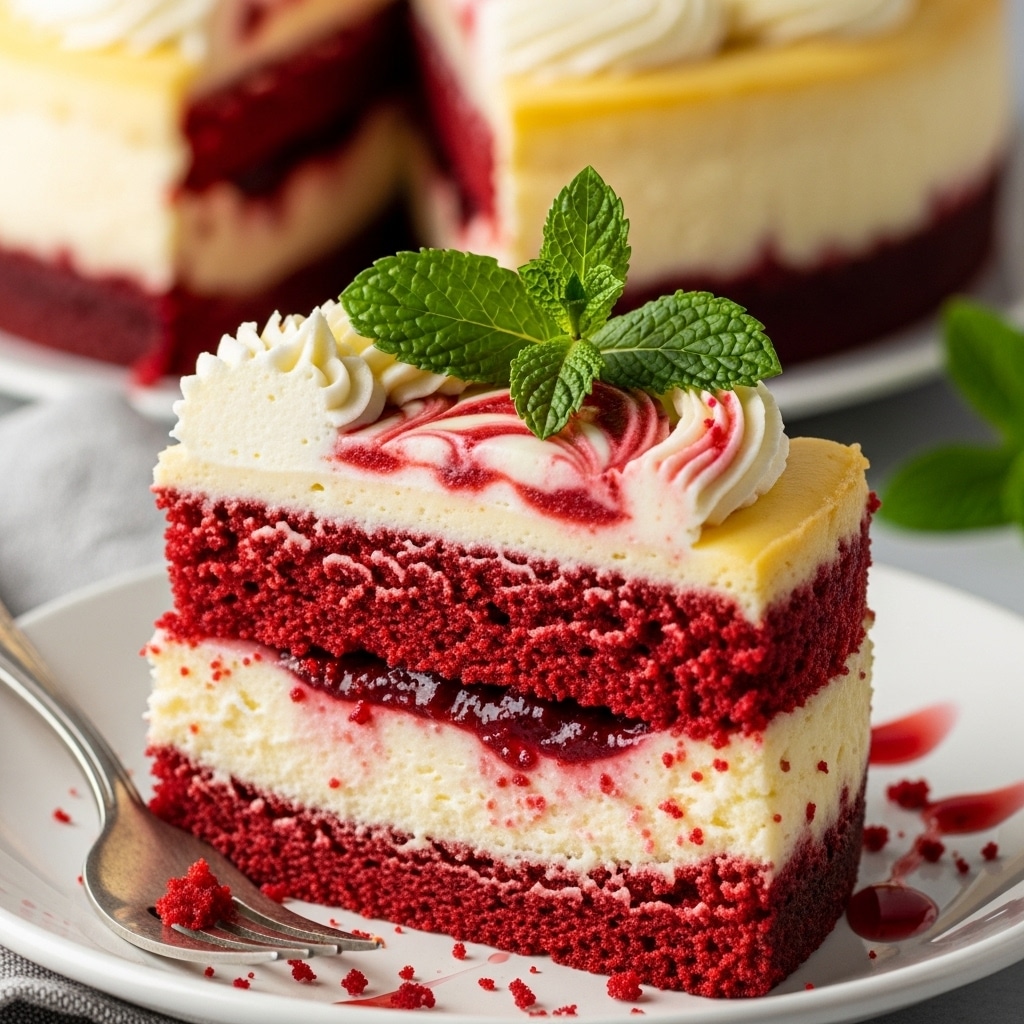
This Red Velvet Cheesecake Cake is the ultimate dessert hybrid, combining two beloved classics into one show-stopping, easy layered dessert. Imagine rich, moist layers of red velvet cake sandwiching a thick, creamy layer of tangy cheesecake. This is not just a cake with cheesecake-flavored frosting; it is an architectural marvel of flavor and texture. While it looks incredibly complex, this recipe breaks down the process into manageable steps. This is the dessert you make when you want to truly “wow” your guests at any holiday or celebration.
The Ultimate Dessert Hybrid
What Is a Red Velvet Cheesecake Cake?
This dessert is a masterpiece of layers. It consists of two moist red velvet cake layers and one complete cheesecake layer, which is baked separately and then stacked. The entire creation is then enrobed in a tangy cream cheese frosting. It combines the tender, velvety crumb of the cake with the dense, rich creaminess of the cheesecake.
Why This Recipe Works
The secret to this easy layered dessert is managing the components. We bake the cheesecake first, allowing it to chill thoroughly, which makes it firm and easy to handle. Then, we bake the red velvet cake layers. The contrast between the tangy cheesecake and the mild cocoa flavor of the red velvet is what makes this Red Velvet Cheesecake Cake so addictive.
📄 Want to keep this recipe for later? Download your printable PDF version now and start cooking anytime!
📥 Download Recipe PDF✅ Print-friendly • 🕒 Save for later • 📱 Mobile-accessible
💡 Want more like this? Subscribe for weekly printable recipes!

Red Velvet Cheesecake Cake: An Easy Layered Dessert
- Total Time: 3 hours
- Yield: 16 servings
Description
This Red Velvet Cheesecake Cake is the ultimate easy layered dessert. It features two layers of moist red velvet cake sandwiching a thick, creamy, tangy cheesecake layer, all covered in a classic cream cheese frosting. This recipe guides you through the simple, manageable steps to create a true show-stopping dessert.
Ingredients
For the Cheesecake Layer:16 ounces (452g) block cream cheese, room temperature3/4 cup (150g) granulated sugar2 large eggs, room temperature1/2 cup (120g) sour cream, room temperature1 teaspoon vanilla extractFor the Red Velvet Cake Layers:2 1/2 cups (300g) all-purpose flour1 1/2 cups (300g) granulated sugar1 teaspoon baking soda1 teaspoon salt1 tablespoon (15g) unsweetened natural cocoa powder1 1/2 cups (360ml) vegetable oil1 cup (240ml) buttermilk, room temperature2 large eggs, room temperature1 tablespoon (15ml) red food coloring (gel)1 teaspoon white vinegar1 teaspoon vanilla extractFor the Frosting:16 ounces (452g) block cream cheese, room temperature1 cup (227g) unsalted butter, room temperature4 cups (480g) powdered sugar, sifted1 1/2 teaspoons vanilla extract1/4 teaspoon salt
Instructions
1. Make the Cheesecake Layer (Day 1):2. Preheat oven to 325°F (163°C). Grease a 9-inch springform pan.3. In a large bowl, beat the cream cheese and sugar until smooth. Add the eggs one at a time, mixing on low. Stir in the sour cream and vanilla.4. Pour batter into the pan. Wrap the pan tightly in aluminum foil. Place in a large roasting pan. Pour hot water into the roasting pan to come 1-inch up the side of the springform pan.5. Bake for 60-70 minutes, until the edges are set and the center is almost set (still jiggly).6. Turn off the oven and let the cheesecake sit in the cooling oven with the door cracked for 1 hour.7. Remove, let cool to room temperature, then chill in the refrigerator overnight.8. 9. Make the Red Velvet Cake Layers (Day 2):10. Preheat oven to 350°F (175°C). Grease and flour two 9-inch round cake pans (not springform).11. In a large bowl, whisk the flour, sugar, baking soda, salt, and cocoa powder.12. In a separate bowl, whisk the oil, buttermilk, eggs, red food coloring, vinegar, and vanilla.13. Pour the wet ingredients into the dry ingredients and whisk until just combined. Do not overmix.14. Divide the batter between the two 9-inch pans. Bake for 30-35 minutes, or until a toothpick comes out clean.15. Cool layers in the pans for 15 minutes, then invert onto a wire rack to cool completely.16. 17. Make the Frosting (Day 2):18. In a large bowl, beat the room-temperature cream cheese and butter until smooth.19. On low speed, gradually add the sifted powdered sugar. Add the vanilla and salt.20. Beat on medium-high for 2-3 minutes until light and fluffy.21. 22. Assemble the Cake (Day 2):23. Place one red velvet cake layer on a serving platter.24. Carefully remove the chilled cheesecake from the springform pan and place it on top of the cake layer.25. Place the second red velvet cake layer on top of the cheesecake.26. Apply a thin crumb coat of frosting over the entire cake. Chill for 30 minutes.27. Frost the cake with the remaining frosting. Chill until ready to serve.
Notes
Chilling is Mandatory: The cheesecake MUST be chilled overnight to become firm enough to stack. Do not rush this step.Room Temperature Ingredients: Use room temperature cream cheese, eggs, and sour cream for the cheesecake to ensure a smooth, lump-free texture.Slicing: To get clean slices, use a large, sharp knife. Dip the knife in hot water and wipe it dry between each cut.
- Prep Time: 1 hour
- Cook Time: 2 hours
- Category: Dessert
- Method: Bake
- Cuisine: American
Nutrition
- Serving Size: 1 slice
- Calories: 780 kcal
- Sugar: 60g
- Sodium: 500mg
- Fat: 45g
- Saturated Fat: 18g
- Unsaturated Fat: 27g
- Trans Fat: 1g
- Carbohydrates: 80g
- Fiber: 1g
- Protein: 10g
- Cholesterol: 150mg
Component 1: The Cheesecake Layer
Preparing the Cheesecake
This cheesecake layer is baked without a crust, as it will be supported by the cake layers. You must bake it in the same size pan as your cake layers (a 9-inch springform pan is ideal). The batter is a simple mixture of cream cheese, sugar, eggs, sour cream, and vanilla. The sour cream adds an extra tang and a supremely creamy texture.
Baking in a Water Bath
To prevent cracking and ensure a dense, even texture, we bake the cheesecake layer in a water bath (or bain-marie). This involves wrapping the springform pan tightly in aluminum foil and placing it in a larger roasting pan. You then pour hot water into the roasting pan to come halfway up the sides of the cheesecake pan. This gentle, humid heat cooks the cheesecake evenly.
Component 2: The Red Velvet Cake Layers
A Moist and Sturdy Crumb
The red velvet cake layers for this recipe need to be both moist and flavorful, but also sturdy enough to support the heavy cheesecake layer. This recipe uses a combination of buttermilk and oil to achieve this perfect balance. It delivers that classic, tangy velvet flavor that pairs perfectly with the cheesecake.
Baking the Cake Layers
After the cheesecake is baked and chilling, you will bake the two 9-inch red velvet cake layers. This is a standard red velvet batter. You mix the dry ingredients, mix the wet ingredients, and then combine them. Be careful not to overmix, which would make the cake tough. These layers must be cooled completely before you can begin assembly.
Assembling Your Easy Layered Dessert
The Chilling Process is Key
Patience is essential for this Red Velvet Cheesecake Cake. The cheesecake layer must be baked and then chilled completely, ideally overnight. A cold, firm cheesecake is easy to remove from the pan and place between the cake layers. Attempting to stack a warm or “just-set” cheesecake will result in a complete structural collapse.
Stacking Your Masterpiece
Assembly is the most exciting part. Place one cooled red velvet cake layer on your serving platter. Carefully top it with the chilled, unwrapped cheesecake layer. Then, place the second red velvet cake layer on top of the cheesecake. Press down gently to secure the layers. At this point, you have a stunning, multi-layered tower.
Frosting This Red Velvet Cheesecake Cake
A Sturdy Cream Cheese Frosting
The frosting for this cake needs to be stable enough to hold the tall, heavy layers together. This recipe uses a classic blend of block-style cream cheese, butter, powdered sugar, and vanilla. Beating the butter and cream cheese until smooth before adding the sugar is key. This provides a tangy, delicious “glue” that complements both the cake and the cheesecake.
The Crumb Coat and Final Coat
Because this cake is so tall, a crumb coat is mandatory. Apply a thin layer of frosting over the entire cake to seal in the red velvet crumbs. Chill the cake for at least 30 minutes. This firms up the structure and makes the final frosting layer smooth and clean. You can decorate the finished cake with red velvet crumbs or chocolate shavings.
Planning Your Baking Schedule
A Two-Day Process
For the best results and minimal stress, plan to make this Red velvet Cheesecake Cake over two days. This recipe is an easy layered dessert, but it is not a fast dessert. Rushing the chilling times is the only way this recipe can fail.
Sample Baking Timeline
This table provides a logical workflow for tackling this impressive dessert.
| Day | Task | Description |
| Day 1 | Bake the Cheesecake | Prepare and bake the cheesecake layer in a water bath. |
| Day 1 | Chill the Cheesecake | Let the cheesecake cool, then chill it overnight in the refrigerator. |
| Day 2 | Bake Cake Layers | Prepare and bake the two red velvet cake layers. Let cool completely. |
| Day 2 | Make Frosting | Prepare the cream cheese frosting while the cake layers cool. |
| Day 2 | Assemble and Chill | Stack the cake, cheesecake, and frosting. Apply a crumb coat. |
| Day 2 | Final Frosting | Apply the final layer of frosting. Chill until ready to serve. |
This dessert is a true centerpiece. It takes the concept of layered desserts, like this Red Velvet Strawberry Delight Cheesecake, to a whole new level.
Frequently Asked Questions
My cheesecake cracked! Can I still use it?
Absolutely. Since the cheesecake layer is hidden in the middle of the cake and covered in frosting, cracks do not matter at all. The water bath helps prevent them, but it is purely an aesthetic issue that gets covered up.
This cake seems very tall. How do I slice it?
To slice this Red Velvet Cheesecake Cake cleanly, use a long, sharp knife. Dip the knife in hot water and wipe it dry before each cut. The hot blade will glide through the dense cheesecake and moist cake layers, creating clean, beautiful slices.
Can I use a store-bought cheesecake?
Yes, if you are short on time, you can use a high-quality, pre-baked 9-inch cheesecake (preferably without a crust). This will significantly cut down on the prep time, turning this into a much easier layered dessert.
Conclusion
This Red Velvet Cheesecake Cake is the epitome of decadent, celebratory desserts. While it requires time and patience, the steps themselves are simple and manageable. By baking the components separately and allowing for proper chilling, you create an easy layered dessert that is structurally sound and incredibly delicious. The combination of moist, tangy red velvet cake and rich, creamy cheesecake is an unparalleled flavor experience. This is more than just a cake; it is an event, and it is worth every single step.

